Contact form for static website

I have recently put together an Adobe Muse website hosted in GitHub Pages here: www.arthurgareginyan.com. GitHub Pages accepts static HTML and can’t execute languages like PHP or use a database. I love static websites. They are simple and fast. But they don’t have a back-end to create things such as contact form. So firstly I was just giving my email address on the website, which turned out to be bad idea. Then I googled and stumbled upon Formspree, and I fell in love.
Formspree (http://formspree.io) is a free online service (form-to-email API) which gives you the ability to create functional HTML forms without the use of PHP or JavaScript. This tool was built by the guys from Brace, then open-sourced and hosted by Assembly.
Features:
- Basic HTML work
- No PHP
- No JavaScript
- No Database
- No Hosting required
- No Sign up
- Is free for 1000 submissions per email each month
- Can be use on Blogger and other free blogging sites
Create Your Form
Setting it up is easy and free. You don’t even have to register.
To create a simple contact form you just need to copy the following code and paste it where you want to display a form:
<form action="//formspree.io/your@email.com" method="POST">
    <input type="text" name="name">
    <input type="email" name="_replyto">
    <input type="submit" value="Send">
</form>
Note: Replace
your@email.comwith your email address.
Go to your website and submit the form once. This will send you an email asking to confirm your email address, so that no one can start sending you spam from random websites.
That’s it, your form already works! It will post the form onto an external domain, formspree.io, and send you an email with all the form content. No database. And you can just hit reply in your mailbox to continue the conversation with your visitor.
Advanced Features
Form inputs can have specially named name-attributes, which alter functionality. You can read more about this at http://formspree.io.
Styling the form
We can style this contact form however we want. There’s no iframe or anything else to restrict how it looks. Just add the attribute id or class to tags that you want to styling and wrap the stylesheet for it with HTML tag < style>. Example:
<form id="my-contact-form" action="//formspree.io/your@email.com" method="POST">
    <input class="field" type="text" name="name">
    <input class="field" type="email" name="_replyto">
    <input class="button" type="submit" value="Send">
</form>
<style>
   #my-contact-form {
    ...
   }
   .field {
    ...
   }
   .button {
    ...
   }
</style>
My Contact Form
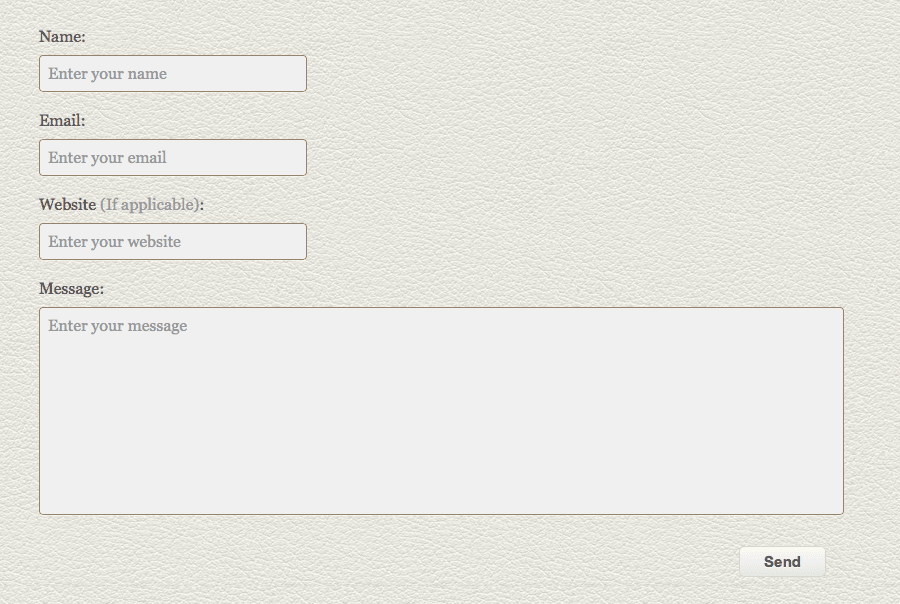
I hope that my contact form is going to be a very simple way for people to get in touch with me. It have a field for their name, email, website, and their message. Also it have a “honeypot” field to avoid spam. After sending the message, the user will be redirected to the “thank you” page.
Here’s the markup for my form:
<form id="contact-form" action="http://formspree.io/your@email.com" method="POST">

    <div class="form-title">Name:</div>
    <input type="text" name="name" placeholder="Enter your name" class="form-field">

    <div class="form-title">Email:</div>
    <input type="email" name="_replyto" placeholder="Enter your email" class="form-field">

    <div class="form-title">Website:<span style="color:#aaaaaa">(If applicable)</span>:</div>
    <input type="url" name="website" placeholder="Enter your website" class="form-field">

    <div class="form-title">Message:</div>
    <textarea name="message" rows="10" placeholder="Enter your message" class="form-field form-message"></textarea>

    <input type="hidden" name="_subject" value="Website contact" />
    <input type="hidden" name="_next" value="//www.arthurgareginyan.com/thanks.html" />
    <input type="text" name="_gotcha" style="display:none">

    <div class="buttons-container">
       <input type="submit" value="Send" class="buttons">
    </div>

</form>
Here’s the stylesheet for it:
<style>
#contact-form {
   font-family: Georgia, Palatino, Palatino Linotype, Times, Times New Roman, serif;
   font-size: 16px;
}

.form-title {
   margin-bottom:10px;
   color: #6B6B6B;
   text-shadow: #fdf2e4 0 1px 0;
}

.form-field {
   border: 1px solid #a39584;
   background: #f3f3f3;
   -webkit-border-radius: 4px;
   -moz-border-radius: 4px;
   border-radius: 4px;
   color: #C4C4C4;
   -webkit-box-shadow: rgba(255,255,255,0.4) 0 1px 0, inset rgba(000,000,000,0.7) 0 0px 0px;
   -moz-box-shadow: rgba(255,255,255,0.4) 0 1px 0, inset rgba(000,000,000,0.7) 0 0px 0px;
   box-shadow: rgba(255,255,255,0.4) 0 1px 0, inset rgba(000,000,000,0.7) 0 0px 0px;
   padding: 8px;
   margin-bottom: 20px;
   width: 250px;
}
.form-field:focus {
   background: #fff;
   color: #725129;
}

.form-message {
   width: 100%;
}

.buttons-container {
   margin:8px 0;
   text-align:right;
}

.buttons {
    -moz-box-shadow:inset 0px 1px 0px 0px #ffffff;
    -webkit-box-shadow:inset 0px 1px 0px 0px #ffffff;
    box-shadow:inset 0px 1px 0px 0px #ffffff;
    background:-webkit-gradient(linear, left top, left bottom, color-stop(0.05, #f9f9f9), color-stop(1, #e9e9e9));
    background:-moz-linear-gradient(top, #f9f9f9 5%, #e9e9e9 100%);
    background:-webkit-linear-gradient(top, #f9f9f9 5%, #e9e9e9 100%);
    background:-o-linear-gradient(top, #f9f9f9 5%, #e9e9e9 100%);
    background:-ms-linear-gradient(top, #f9f9f9 5%, #e9e9e9 100%);
    background:linear-gradient(to bottom, #f9f9f9 5%, #e9e9e9 100%);
    filter:progid:DXImageTransform.Microsoft.gradient(startColorstr='#f9f9f9', endColorstr='#e9e9e9',GradientType=0);
    background-color:#f9f9f9;
    -moz-border-radius:6px;
    -webkit-border-radius:6px;
    border-radius:6px;
    border:1px solid #dcdcdc;
    display:inline-block;
    cursor:pointer;
    color:#666666;
    font-family:Arial;
    font-size:15px;
    font-weight:bold;
    padding:6px 24px;
    text-decoration:none;
    text-shadow:0px 1px 0px #ffffff;
}
.buttons:hover {
    background:-webkit-gradient(linear, left top, left bottom, color-stop(0.05, #e9e9e9), color-stop(1, #f9f9f9));
    background:-moz-linear-gradient(top, #e9e9e9 5%, #f9f9f9 100%);
    background:-webkit-linear-gradient(top, #e9e9e9 5%, #f9f9f9 100%);
    background:-o-linear-gradient(top, #e9e9e9 5%, #f9f9f9 100%);
    background:-ms-linear-gradient(top, #e9e9e9 5%, #f9f9f9 100%);
    background:linear-gradient(to bottom, #e9e9e9 5%, #f9f9f9 100%);
    filter:progid:DXImageTransform.Microsoft.gradient(startColorstr='#e9e9e9', endColorstr='#f9f9f9',GradientType=0);
    background-color:#e9e9e9;
}
.buttons:active {
    position:relative;
    top:1px;
}
</style>
And that’s how it looks: 
If this article has helped you then please leave a comment ![]()
Thanks for reading!
Arthur is a designer and full stack software engineer. He is the founder of Space X-Chimp and the blog My Cyber Universe. His personal website can be found at arthurgareginyan.com.


